The zen of composting
We all create organic waste from our kitchens so we thought it would be fun and useful to outline our recipe for compost this week. This living, well-balanced soil can be used to grow more food!
Meg and I both harvest our home grown vegetables from raised beds in the city of Chicago and Lake Forest.
So why compost?
- Turn your food into fertilizer by recycling food scraps
- Take the strain off the environment and our landfills where our organic waste gets trapped.
I reached out to a good friend of mine Erin Fuller who has been composting, since she was knee-high to a grasshopper, at her family home in Wisconsin and now here in our Community Garden in Chicago. Her green fingers and dedication have allowed our weekly harvests and donations for WIC (Women, Infants and Children) possible.
Here is Erin’s word on successful composting.
|
Preparation Time – as long as it takes for you to chop and add to it |
Ingredients
-
1 composting bin for outdoors, minimum 3′ x 3′ to ensure sufficient heat builds up to allow the biological processes to occur. The type of bin you choose will have an effect on exactly how you harvest your finished compost but you can make your own bin from old crates or purchase one from a garden center.
-
A small trash bin with a lid under your sink or in your garage, to collect household kitchen scraps. Contrary to popular belief, if you choose a small bin with a lid, you will not notice any odour. Mine remains underneath my sink and I empty it every 2 or 3 days into the larger compost bin outdoors.
-
“Greens” – the wet materials rich in nitrogen and “browns” – generally dry and rich in carbon plus miscellaneous items from the table below.

Method
Step 1
Start your compost pile with a generous layer of chopped browns, 20 – 30 inches in length, on the bottom. The smaller the material the faster it will break down.
Step 2
Alternate the layers of greens and browns. You should use 2 to 3 times as much browns as greens. Add browns as a finishing layer each time. You can also add a little soil occasionally.
Step 3
Add water if it isn’t moist to touch and give it a good stir every 2 – 3 weeks during summer to aerate it. This helps the micro-organisms multiply increasing the heat. The hotter your pile, the faster you get finished compost!
Step 4
It’s cooked!
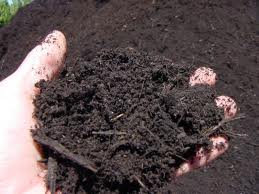
Your compost is ready to use when it is dark brown, smells like earth, and crumbles in your hand.To ensure a successful outcome of healthy compost just feed your pile the right foods in the right proportions.
For more information on keeping out unwanted visitors, check out our pest proofing section.
– Adapted from: http://greenactioncentre.ca/
Zen Moment
“The ground’s generosity takes in our compost and grows beauty! Try to be more like the ground.”
― Rumi

